
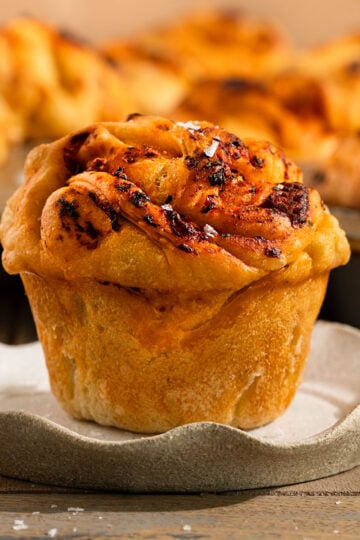
This Vegan Garlic Pull Apart Bread is made with a garlic herb dough and filled with layers of vegan garlic butter for the best ever dairy-free garlic bread recipe. This pull-apart bread is truly irresistible, flaky, and SO fun to eat!

Last year I made a savory Spinach Tomato Babka and, since then, I've been very into bread baking. The dough for this recipe is heavily based off that recipe, but the minced garlic & butter filling truly makes this bread SO delicious.
If you loved my Vegan Garlic Herb Pizza Dough, then get prepared to fall head over heels for this vegan garlic bread recipe!
Garlic Bread Ingredients:

Ingredient Notes:
- Vegan butter: Any brand works, but my favorites to use for baking are Miyokos, Earth Balance, or Country Crock.
- Yeast: I used Red Star Active Dried Yeast and use it in almost all of my bread recipes! Instant Yeast can be subbed 1:1 in this recipe, but it can be added directly to the dry ingredients as it does not need to be activated in warm water.
How to make vegan garlic bread from scratch
- Activate the yeast in warm water. If using instant yeast, you can skip this step.
- Mix in the melted vegan buttter.
- Gradually add in the all-purpose flour along with the garlic powder, Italian seasoning, and salt.
- Mix together until a shaggy dough forms.

5. Knead the bread dough. You will know the dough is ready and kneaded when it has become smooth, elastic, and tacky, but no longer super sticky. It will also be easy to stretch the dough without it easily tearing and you can perform the windowpane test.

6. Add the dough to a well-oiled bowl.
7. Cover and let rise until doubled in size. The dough is done rising when you can indent it with a finger and it does not bounce back.

How to make vegan garlic butter
While the bread is rising, make the garlic butter filling. All you need is 3 simple ingredients to make this filling: salted vegan butter, minced garlic, and chili flakes.
Once you have all the ingredients ready, just mash them together until a smooth vegan garlic butter forms. Then, set aside.

How to assemble pull apart bread
- First, divide the dough into 10-12 even pieces and roll them into balls.
- Flatten each dough ball into 4-inch circles. I like using a rolling pin, but you can also use your hand as they definitely don't need to be perfect.
- Next, spread the garlic butter on top. Then, fold it half so it resembles a taco. This is actually a technique I learned from Sally's Baking Addiction and makes it so the butter doesn't all seep to the bottom of the pan while baking.
- Then, line a loaf pan with parchment paper and place the folded dough circles into the pan so the "open" end of each is facing upwards.

Once the bread is assembled, Cover and allow to rise for another 30 minutes while preheating the oven.
Right before baking, I like to glaze the top of the dough with a little melted vegan butter. This helps the bread get extra brown and crispy on top.

Then, add to the oven and bake for 40-45 minutes until the bread has cooked through.

FAQ & Tips:
Unfortunately, I don't recommend it. While many people say you can just sub a GF flour 1:1, I haven't had success doing this. Forming gluten is vital to the structure of this bread and without gluten, you really won't have the right texture for this recipe.
Definitely! While I haven't tried any other filling, you could definitely sub the garlic butter for vegan pesto, a cashew cream sauce, or even make this bread sweet and do a cinnamon sugar filling instead (in which case you'd want to remove the herbs and garlic from the dough too).
Yes! This bread can be stored in a closed container in the freezer for up to 1 month. I recommend breaking it into slices before storing it so it's easier to remove, defrost, and reheat.
If not freezing, this garlic bread can be stored in a closed container or wrapped in tin foil. It will keep at room temperature for 2 days or in the fridge for up to 5 days.

I truly can't wait for you to make this absolutely addicting Vegan Garlic Pull-Apart Bread. Dairy-free garlic bread has never been so delicious and so fun to eat. Enjoy!
-TSG
More Yeasted Bread Recipes You Will Love:


If you loved this recipe, please leave a 5-star review on the recipe card. I always appreciate your feedback and support! You can also follow along on my Instagram, Facebook, TikTok, and Pinterest, or sign up for our newsletter!

Vegan Garlic Pull Apart Bread
Ingredients
Bread Ingredients
- ¾ cup warmed water
- 2 ¼ teaspoon active dried yeast
- ¼ cup melted vegan butter *unsalted
- 2 ½ cups all-purpose flour *use up to 2 ½ cup+ 2 tablespoon if needed
- 1 teaspoon Italian seasoning
- 1 teaspoon salt
- 1 teaspoon garlic powder
Garlic Butter Filling
- 6 tablespoon salted vegan butter room temperature/softened
- 6 cloves garlic finely minced
- ¼ teaspoon chili flakes optional, for spice
Other
- melted vegan butter *to brush on bread before baking
- flaky sea salt *optional as topping on baked bread
Instructions
First, make the bread dough:
- Add the luke-warm water and yeast to a mixing bowl and let sit 5-10 minutes to activate the yeast. Then, add in the melted vegan butter and mix together.
- Next, add the flour,Italian seasoning, garlic powder, and salt and mix together until a thick yet shaggy dough forms.
- Once the dough has formed, it’s time to knead the bread. If you are using a standing mixer, use the bread hook to knead the dough until it is elastic and no longer sticking to the sides of the bowl (about 5-7 minutes). If you are kneading by hand, add the dough to a well-floured surface and knead for 8-10 minutes. The dough is done kneading when it is smooth and tacky, but not super sticky, and can be easily stretched without tearing.
- When the dough is elastic and well-kneaded, form into a round ball. Place the dough into a well-oiled bowl. Then, cover the bowl with plastic wrap or a towels and let risefor about 1 hour until the dough has doubled in size.
Make the garlic butter filling:
- While the dough is rising, make the garlic butter. Start by finely mincing the garlic cloves.
- Then, add the room temperature butter, minced garlic, and chili flakes to a bowl and mash together until smooth. If using unsalted butter, you may want to add ¼ teaspoon salt to the filling as well.
Shape the Pull Apart Bread
- First, line a loaf pan with parchment paper or lightly grease it and set aside.
- Once the dough has doubled in size, punch it down to remove excess air and remove it from the bowl. Then, add it to a well floured surface and divide it into 10-12 evenly sized pieces. Then, roll each section of dough into a round ball.
- Next, take each ball and use your hands or a rolling pin to flatten them into a circular disc. The circle doesn't have to be perfectly round.
- Then, spread about 2 teaspoon of the garlic butter filling onto each disc. Fold each disc in half and line them in the prepared baking pan with the round side up.
- Cover the loaf pan of bread with a towel and let rise another 30 minutes.
- Uncover the bread and preheat the oven to 350F. Then, brush the bread with a little melted butter before baking. This will help the crust brown.
- Add the bread to the oven and bake for 40-50 minutes until the top is browning and the bread has cooked through.
- Remove the bread from the oven and let cool in the pan for 5-10 minutes. Then, remove from the pan and place onto a wire rack. Top with optional flaky sea salt , pull apart, and enjoy!
Notes
- This bread can be stored in a closed container in the freezer for up to 1 month. I recommend breaking it into slices before storing it so it's easier to remove, defrost, and reheat.
- If not freezing, this garlic bread can be stored in a closed container or wrapped in tin foil. It will keep at room temperature for 2 days or in the fridge for up to 5 days.


Sara says
Made this over the weekend and it was amazing! Megan, I had a couple issues and I hope you could advise as to why. After I proofed my dough for one hour, when I took it out of the bowl, it completely deflated. Why?? also, after baking, the top of my bread was quite crispy. It was still good, but any clue why that happened? I think I may have made the rounds a little thin. Ty for the awesome recipe, will definitely make again!
Megan says
If the bread deflated and was a bit crispy vs. fluffy after baking I'm going to guest it was a problem with the yeast. Either your yeast may be old/ not working any more or the water you added may have been too hot and killed the yeast (it should just be luke-warm not hot). Let me know if you try it again with different yeast if that solves the problem 🙂
Jennifer says
Would this work as a cheese bread as well ? Maybe using Miyokos liquid vegan mozzarella on top or inside with the butter ?
Megan says
I honestly don't think a liquid cheese would work but you could likely add some grated cheese in between the bread/on top!
Cynthia Cuevas says
This recipe looks so good! Is it possible to make it into individual balls and just brush them with the butter?
Megan says
I really didn't make this recipe with that in mind- I'd recommend finding a different recipe if you're looking to make rolls 🙂
Amber Yuen says
Omigosh this is SUCH a good recipe! It's so fluffy, garlicky and buttery. I made this for my family and we ate it all up for dinner, and my dad wants me to make it again. SOOO good! The only thing is for me I wouldn't add the full amount of butter because it's too much, but personal preference. I will definitely be making it again. I literally have butter in the fridge just for this purpose!! Love, love love!!
Kendra says
Can you substitute the vegan butter for olive oil?
Megan says
In the dough yes, though you may need more salt. In the filling, no, as you need to use solid vegan butter for the recipe to work.
Rose says
This recipe is really good and so easy to follow for a beginner like me. It was so good that there are only 3 of us but we almost ate the whole loaf 😅
Megan says
So glad you liked it & thank you for the review!
Denise says
Hi,
How big does the loaf pan need to be? Thanks!
Megan says
Just a standard 1-pound loaf pan- I used one by USA pans and the dimensions are 8.5 x 4.5 x 2.75. Hope that helps!
Lois says
Do you need to put some sugar in with the yeast?
Megan says
Nope just warm water to activate it, it really doesn't need sugar if it's active dried yeast or instant yeast.