
Who is ready for vegan pizza rolls?! I know I've been teasing you all with a more savory bun recipe for a while now, so I am overly excited to share this recipe for Vegan Caramelized Onion & Spinach Pizza Buns with you today!

How to make vegan pizza rolls:
First, make the pizza dough:
The key to making this vegan pizza dough at home is to let it rise covered in the fridge for 24-48 hours. This allows the yeast to slowly ferment and brings out the best flavor in the dough. If you don't have time for that, letting the dough rise until doubled at room temperature still works (and it takes about 2 hours), but the flavor of the dough won't be quite as good.
If making homemade pizza dough a day or two ahead of time sounds like too much work, that's okay!
A store-bought pizza dough works just as well and is a great replacement for these dairy-free pizza rolls. Also, store-bought or homemade gluten-free pizza dough will work in this recipe to make it entirely gluten-free.

Assemble & bake the buns the next day:
Remove the vegan pizza dough from the oven about 1 hour before you're ready to bake the buns. Punch down the dough, and then let it sit at room temperature for about 1 hour before rolling the dough.
The dough will be pretty stiff right out of the fridge, so giving it this extra hour of time helps it to work best. Then, make the caramelized onions & spinach about 30-40 minutes before you are ready to put everything together.
Steps 1 & 2
Now assemble your pizza roll ingredients! This includes your tomato sauce, caramelized onions & spinach, nutritional yeast, and fresh basil. Next, roll out your dough.


Steps 3 & 4
Spread the tomato sauce onto the vegan pizza roll dough and make sure to leave a 2-inch border around the dough. Then, scoop on the caramelized onion and spinach mixture.


Steps 5 & 6
For extra tasty vegan pizza rolls, sprinkle on fresh basil! After all the toppings are on, roll the pizza bun dough into a log. Pinch the edges of the dough together to seal.


Steps 7 & 8
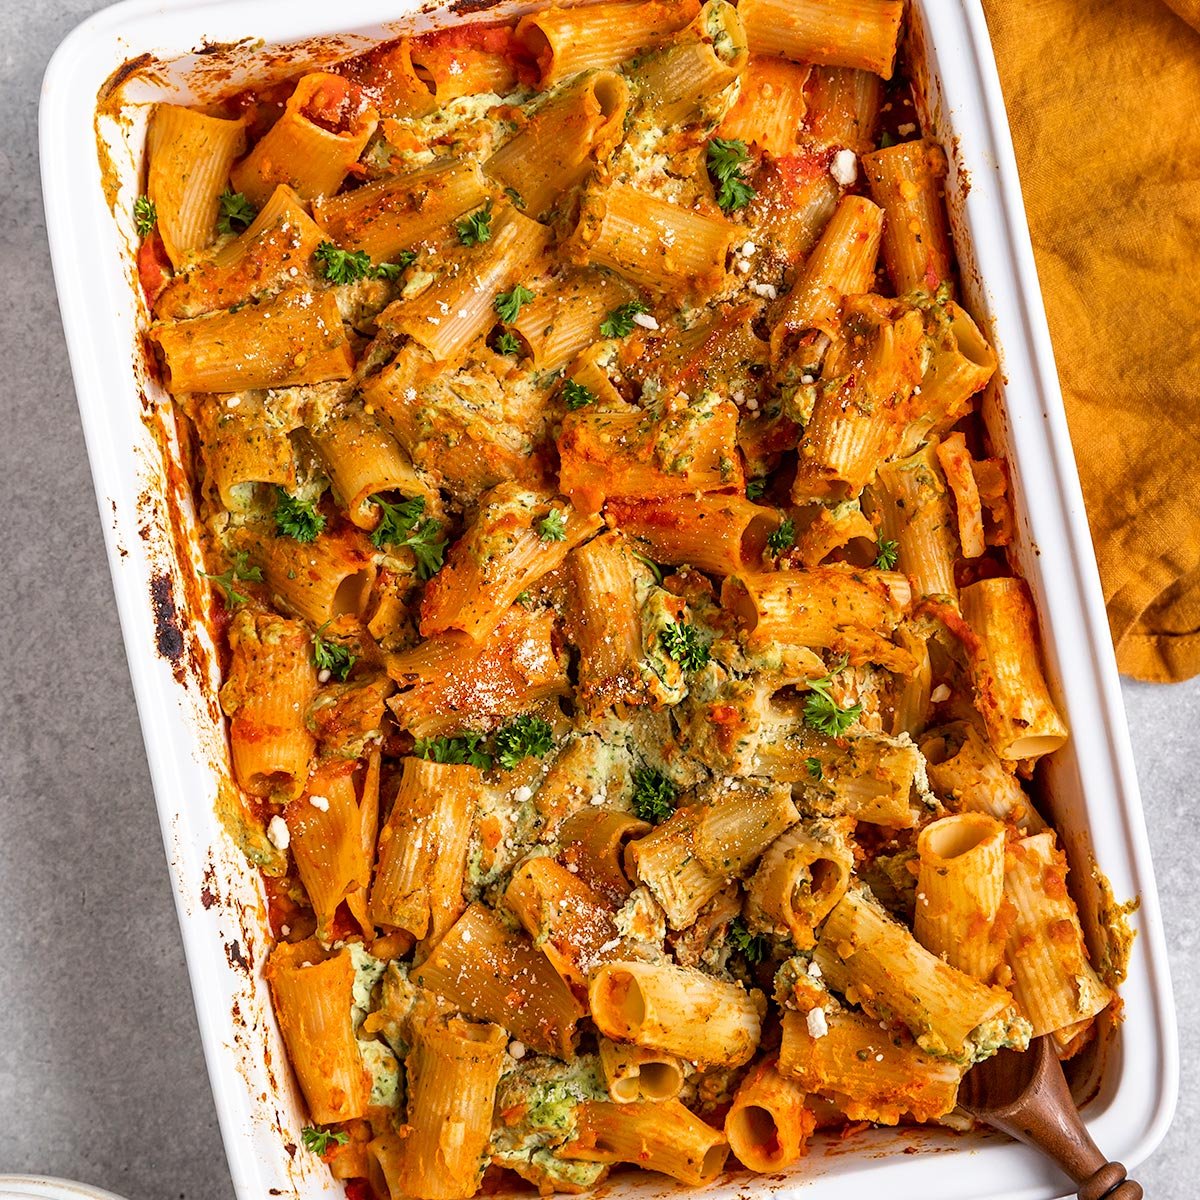
Cut the pizza buns into 12 even slices & place them into a greased 9 x 13-inch baking dish. Sprinkle nutritional yeast on top to give the buns that "cheesy" flavor while keeping them vegan! Vegan cheese can also be added on top if you would like that.


Step 9
Bake the pizza rolls at 375F for 34-38 minutes until the outside is browned and crisp and the inside of the buns are tender and cooked through.
Okay, I lied, now it's truly time for the best step.
Step 10: Slice your buns & EAT!

I hope you enjoyed this step-by-step vegan pizza roll tutorial. January is looking pretty savory here on SGTO, however, you know I couldn't go a whole month without making a new vegan bun recipe.
Just in case you're looking for a sweet bun recipe to pair with these vegetarian pizza rolls, check out these Vegan Pumpkin Pie Cinnamon Buns or Vegan Carrot Cake Sticky Buns to have for dessert. Enjoy!
-TSG


If you loved this recipe, please leave a 5-star review on the recipe card. I always appreciate your feedback and support! You can also follow along on my Instagram, Facebook, TikTok, and Pinterest, or sign up for our newsletter!

Vegan Caramelized Onion Spinach Pizza Rolls
Ingredients
Pizza Dough Ingredients
- 1 cup warmed almond milk or other vegan milk
- 2 Tablespoons sugar
- 2 ¼ teaspoons active dry yeast 1 standard packet
- ¼ cup oil olive or avocado oil recommended
- 1 teaspoon dried oregano
- 1 teaspoon garlic powder
- 1 teaspoon dried basil
- 3 cups all purpose flour 375 grams
- 1 ½ teaspoons salt
Caramelized Onions & Spinach
- 1 large onion sliced
- 4 cups spinach loosely packed
- 2 Tablespoons vegan butter
- salt & pepper to taste
Bun Filling
- ⅔ cup tomato sauce
- 8-10 leaves fresh basil torn
- 1-2 Tablespoons nutritional yeast optional
Instructions
Make The Pizza Dough 24-48 hours ahead of baking
- Add your warmed almond milk, and sugar to a mixing bowl and whisk together. Next, add the yeast to the bowl and whisk. Let sit 5 minutes to make sure the yeast is activated and forming bubbles.
- Once you're sure the yeast is active, add in your oil and pizza dough spices and whisk together. Then, begin adding your flour ½ cup at a time with the salt and mix together until a thick dough forms.
- If you are using a standing mixer, use the bread hook to knead the dough until it is elastic and no longer sticking to the sides of the bowl (about 5-7 minutes). If you are kneading by hand, mix in all the flour to start. Then, flour your hands and turn the dough out onto a well-floured surface and knead for 5-7 minutes. The dough should be tacky, but not sticky, when kneaded and should be easy to stretch without tearing.
- Once the dough is kneaded, form into a ball. Place the dough into a well-oiled bowl (I lightly coat my bowl with olive oil), cover with plastic wrap, and let rise in the fridge for 24-48 hours.
- About 1 hour before you are ready to fill & bake the buns, remove the dough from the fridge, punch the dough down, form back into a ball, and let rise 1 more hour before shaping the dough. The dough will be stiff right out of the fridge and needs this time to reactivate.
Making the caramelized onions & spinach
- While the dough is rising, make the caramelized onions and spinach.
- To caramelize the onions, begin by adding 2 tablespoon of butter to a large frying pan and melt. Once melted, add in the sliced onions and cook at low heat for 20-30 minutes until soft, sweet, and brown. Make sure to stir frequently to evenly cook the onions.
- Once the onions are caramelized and browned, add the spinach to the frying pan, mix with the onions, and cook 2 more minutes until wilted. Remove from the heat and set aside.
Making the buns
- Preheat your oven to 375F.
- After the dough has completed the second rise, turn the dough out onto a well-floured surface. Dust your rolling pin with flour and roll the dough out into a ½ inch thick rectangle.
- Next, add the tomato sauce to the buns and spread out over the dough. Make sure to leave a 2-inch border around the dough without filling.
- Then, add the caramelized onion & spinach mixture on top of the tomato sauce and spread out evenly. Sprinkle the fresh basil on top.
- Now that all the toppings are on the dough, roll it into a log. Make sure to tuck in the filling as you go so it does not escape out the sides of the dough. Pinch the dough together at the seam to seal the rolls. Then, roll the dough over so the pinched seam is facing down.
- Cut the dough into 12 evenly sized slices and place into a greased 9 x 13 inch pan. As a final step, sprinkle the nutritional yeast on top of the buns.
- Bake for 34-38 minutes until the buns are browned on the outside and cooked, yet soft, on the inside.
- Slice the buns and serve with a side of warm tomato sauce for dipping. Enjoy!
Notes
- Leftovers can be stored in the fridge for 3-5 days or in the freezer up to 1 month. Just reheat in the microwave or in the oven at a low temperature (200F) until warmed throughout.


JE says
I have made these a few times now. So good, and easy. I saw a comment asking about the yeast. Just a tip for those interested, I have used bread machine yeast almost exclusively the past few years. And I never proof yeast anymore, and have had good rises in all my breads. Just make sure whatever liquid going in, is the proper temp to activate the yeast. I also did make these with chopped mushrooms once. I would just say to anyone making this for the first time, to not get too many veggies in your roll, cause I found the mushrooms would squish out and I was having to scoop them back on top. And so I haven't done that again, but truthfully, the recipe (as written) is just right. Also, I did cheat, and rather than use tomato sauce, I used a jarred spaghetti sauce. I have also put these in the freezer. The toaster oven works great to heat these through. Thanks for posting. I will be making these again and again.
Megan says
So glad you've been loving them thanks for the review and tips 🙂
andsew4th says
I made these last week. So easy and yummy! I am a plant-based eater...hubby isn't and he gave them a thumbs-up!
Megan says
Yay love to hear it thanks for sharing 🙂
Amber says
I only have quick rise yeast on hand, how would that change how I should prepare the dough?
Megan says
If quick dried yeast is the same thing as instant yeast, it just doesn't need rehydration and I believe it can be added with the dry ingredients. I think it will make the dough rise faster, but I honestly never use it so couldn't say exactly how it will affect the recipe.
Emily says
Would this be good with sautéed mushrooms inside as well?
Megan Horowitch says
Yes that sounds like a great addition! 🙂
Megan Horowitch says
Hi there! So excited for you to start baking bread :). Here are the answers to your questions:
1) The second rise is the 1 hour the dough is at room temperature. You can punch it down and then let it rise again in the bowl, but there is no need to knead it again. After 1 hour, remove the dough from the bowl and build the rolls. This 1 hour time is when you make the caramelized onions & cook the spinach too. I will update the instructions to clarify this! This should answer your third question about the dough rise time as well.
2) You can cut the recipe in half, but you will need to bake in a smaller pan like an 8*8 square pan. You may even want to reduce baking time slightly as the buns may be thinner- I haven't tried it so I don't know by how much time.
Pam says
Thank you so much for your fast reply! And for helping me through this!
Ok, I believe I understand now for the 24-48hr method. Take the dough out of fridge, let it sit at room temp while making the onions etc. Can punch it down, but no need.
Would like to clarify again for the “room temp only method”, which I saw discussed in the comments. It is ok to bypass the fridge and the 24-48 hours completely, and just leave the dough in oiled bowl/covered to rise at room temp for one hour (will not have as complex of flavours, but doable.)
Is there a “second rise” after this? Or do I proceed to make the buns/onions after the one hour rise on the counter?
Thank you again for the help! I truly appreciate it (and need it lol)
Can’t wait to make it! Probably tonight 🙂
Megan Horowitch says
If skipping the time in the fridge, make the dough and let it rise until doubled in a warm place. This could take 1 hour or up to 2 hours. Then, shape the dough, add the filling, slice, and add to the pan. Then, I would let it rest another 30 minutes- 1 hour before baking in the pan. Essentially the second rise time helps it so the yeast has more time to work and will ultimately lead to a lighter and chewier dough :). Hope that makes sense!
Pam says
Thank you so, SO much! I feel better prepared to make dough! Haha! I really appreciate your help 🙂
Holly says
Would coconut milk work for the non-dairy milk?
Megan Horowitch says
Canned coconut milk might be a little thick for this recipe so you may want to water it down a bit. But virtually any non-dairy milk should work 🙂
Lily says
Hi, I’m wondering if I can assemble these the night before baking. After the second rise could they be filled, rolled and sliced and then refrigerated again to bake the next day?
Megan Horowitch says
It should work! I would probably not let the pizza dough rise as long initially if you do it that way as you don't want to overproof the dough.
Vanessa says
Hello! I bought a pre-made dough. Can I still incorporate the oregano, basil, garlic, and other seasonings to the dough after the fact? Will my dough taste bland if I don’t? And if I can, do I just sprinkle it on the pre-made dough or should I knead it in? Thanks!!!!
Megan Horowitch says
I would just use the pre-made dough as is! It shouldn't taste bland if it is a good dough :). If you did want to add the spices in you'll want to knead them in.
Vanessa says
Hello! Since I bought a pre-made dough, can I still add the garlic, basil, and other seasonings to the dough after the fact?
Jenny says
Storage for leftovers... can these be frozen??
Megan Horowitch says
After baking yes! They should keep about 1 month in the freezer. Reheat in the oven at a low temp (200F) until warmed throughout or you can microwave them after defrosting to reheat.
Isabella says
Hi! Had a question, could I make these with whole wheat flour? Would it change the texture or anything?
Megan Horowitch says
It will slightly change the texture as whole wheat has more fiber but it will work as a replacement 1:1 just fine!
Becky says
I made these the other day and they turned out so good! I absolutely love the touch of caramelized onions, they add such a depth of flavor. I made a cashew cream and used it as a dipping sauce and I'm in love. I can't wait to make them again with different flavors.
Megan Horowitch says
Thank you for the great feedback- I'll definitely have to try a cashew cream dipping sauce next time too!
Siobhan says
These are amazing. Since finding the recipe a month ago I’ve made them 3 times. The true test is that my pepperoni roll loving husband keeps asking me to make them again.
Siobhan says
These are amazing. Since finding the recipe a month ago I’ve made them 3 times. The true test is that my pepperoni roll loving husband keeps asking me to make them again.
ShortGirlTallOrder says
So so glad you love them!
Jacob says
I love both cinnamon buns and pizza so when I saw this combo I knew I had to make them! They did not disappoint. The dough is really tasty and fluffy.
Jacob says
I love both cinnamon buns and pizza so when I saw this combo I knew I had to make them! They did not disappoint. The dough is really tasty and fluffy.
ShortGirlTallOrder says
It's the best combo for sure!
Joanne says
This looks so good. I just came across your site. Do you know how I can create a gf dough for it. Thank you so much!!!
mhorowitch8 says
Thank you Joanne! I haven't personally created a gluten-free dough before however you can try substituting a 1:1 gluten-free flour mix and see if that works(I've heard Bob's Red Mill brand is good). You could also buy pre-made gluten-free pizza dough and use that for the recipe. Hope that helps!
Lindsey says
Could I set out the dough to rise on the counter or warm place to rise faster?
ShortGirlTallOrder says
Hi there! Yes you can. Just let it rise until it has doubled in size at room temperature after kneading in a covered & well oiled bowl (about 1-2 hours). Then, turn it out onto a floured surface and follow the rest of the steps as written.